Add a receipt from a file or camera
Upload receipt photos or PDFs and check the extracted information before saving.
Last reviewed 29-09-2026
Use Enter Receipt when you want to inspect and code each purchase before saving or sending it to Reckon. You need full Receipts access; an upload-only user should use Bulk Upload instead. Select the intended company in Connected Files first. If Reckon is connected, wait for that company's file and account lists to load before adding files.
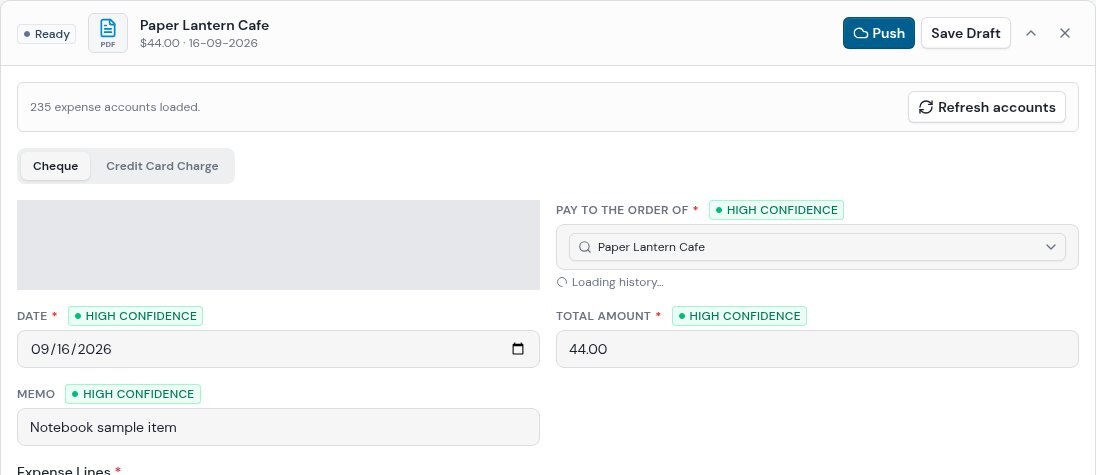
A fictional PDF receipt after extraction, before saving. The shared company's bank-account field is redacted. The visible confidence badges are suggestions, not approval; neither Save Draft nor Push was selected.
- Open Receipts → Enter Receipt.
- Select Choose Files, click the upload area, or drop files from your device into it. Drag & Drop shows instructions; it is not a file picker. On a device with a camera, select Camera to take one photo. You can add further files from the compact upload area.
- Use JPEG/JPG, PNG, WebP, GIF, PDF, HEIC or HEIF, smaller than 20 MB per file. HEIC/HEIF is converted to JPEG in the browser when possible, or sent for server-side conversion. If conversion fails, export the photo as JPEG and try again. A PDF is accepted as a receipt document, not as a supplier bill.
- Wait for each card to move from extraction to Ready, then open it and compare Pay to the order of, Date, Total Amount, Memo and Expense Lines with the source. Click its thumbnail to preview an image or PDF while it is on this entry page. Confidence badges indicate where manual checking matters; they are not approval.
- Continue with Review and code a receipt. Choose Save Draft (or Save when Reckon is not connected) to keep it in Receipt History, or Push only after checking the destination and coding.
For example, upload a fictional café receipt dated 16-09-2026 for AUD 44.00. If the scan identifies only AUD 40.00, correct the total and expense line before saving. For scanned line items, the extracted line-item sum can replace the printed total; always verify struck-out items, GST-free items and the actual amount charged.
Expected result: each successful file becomes an editable card; saving a valid card creates a draft in Receipt History. Remove (the X on an entry card) removes the card from the current entry view; use Receipt History for saved records. If you change companies while cards are open, return to the original company before saving them.
Troubleshooting: an unsupported file or one above the limit shows an error on its card; choose another file. If extraction fails or a PDF cannot be read, try a clear image or a smaller valid file. If you dragged directly from a mail application and no file appears, save the attachment to your device first; email-app drag support depends on whether the app supplies a file. If Company still loading appears, wait for company-file discovery and try again. See Email receipts for a separate email-intake route.
Related: Code a receipt · Bulk upload · Receipts help