Get started with BookFlo
Find your tools, select the right company and file, and prepare a connected Reckon Accounts Hosted file.
Last reviewed 29-09-2026
BookFlo lets you prepare bank transactions, bills and receipts before sending supported transactions to Reckon. Start by confirming whose records you are working on: a company group can contain several Reckon company files. Selecting a company in the sidebar is not the same operation as connecting a file in Companies.
Before you begin
Sign in with an account granted the relevant feature. A company administrator manages connections under Companies; ordinary users work only with the companies and tools made available to them. See Access and permissions.
Choose your work area
- In the left sidebar, choose the company you intend to work on. Where a workflow asks for a file, select the correct company file as well; for emailed documents, use Connected Files to select the destination file.
- Open Bills → Enter Bill, Bulk Upload, Email Bills, Bill History or Bill Settings for supplier invoices.
- Open Receipts → Enter Receipt, Bulk Upload, Email Receipts or Receipt History for receipts. With receipt upload-only access, Bulk Upload is the available receipt workflow, not receipt history or entry.
- Open Bank Feed → Upload Statement, Quick Entry, Reconcile or Feed History for bank and card transactions. Upload Statement imports a statement; it does not connect a live bank feed.
- Open Rules to review or create supplier/payee coding rules, if the tool is available to you.
For example, if you handle a fictional client, Harbourview Joinery Pty Ltd, with separate Trading and Card files, check the chosen file before coding an AUD 148.50 receipt dated 18-09-2026. A correct company group with the wrong file still gives the wrong destination.
Administrator: prepare a Reckon file
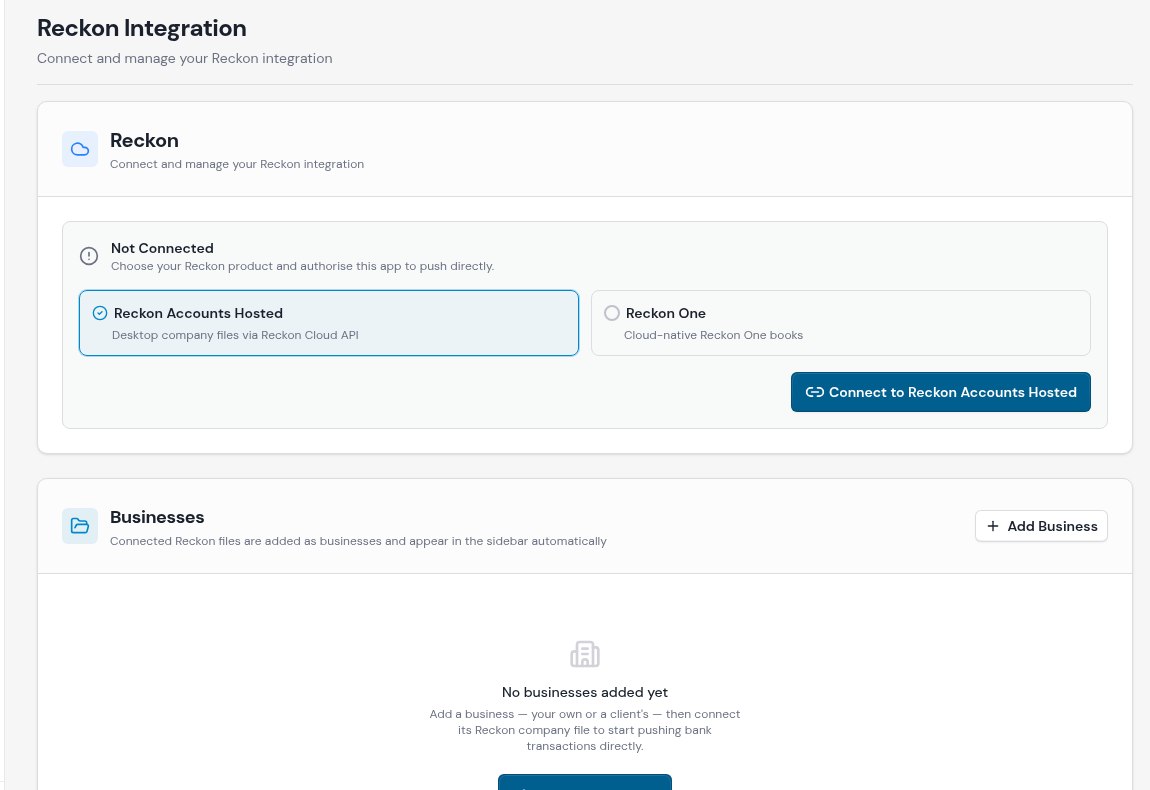
Demonstration account before setup: this screen identifies the connection and business controls. It does not show a connected company file.
- Open Companies. On the Reckon Integration page, check whether the connection says Connected to Reckon or Not Connected.
- If not connected, select Reckon Accounts Hosted and choose Connect to Reckon Accounts Hosted; complete the provider authorisation. If the page reports Credentials not configured, connection is not ready; ask your organisation's administrator to resolve setup rather than attempting to push.
- In the company group, use Add file to this group and select the file, then Connect file. If discovery cannot list files, the page offers a manual company-file-path option; confirm the path with your Reckon administrator. Do not invent a path.
- Inspect the file's Reference Data panel. Allow an in-progress Syncing operation to finish. Last synced and the individual list statuses/counts indicate whether reference lists were fetched. If needed, use Sync now for idle data, Retry sync after an error, or Resync to refresh a previously synced file. These are setup/reference-data operations, not buttons for refreshing a routine transaction form.
- Return to the desired workflow and confirm its company/file selection before entering or pushing a transaction.
Connecting Reckon One and choosing an Active Book are visible options, but current bill, receipt and bank-feed push routes do not support pushing to Reckon One. Use a supported Accounts Hosted connection for these pushes; see Reckon troubleshooting.
Expected result and problems
Your sidebar displays only the tools you can access; the intended company/file is selected and, for Accounts Hosted workflows, the administrator can see a connected file and its reference-data state. If a tool is missing, ask the administrator to check feature access and company sharing rather than switching to someone else's account. If lists are unavailable or a push fails, read the on-screen error and troubleshoot the connection; don't repeatedly push while the outcome is unknown.
Next: Bank Feed · Bills · Receipts · Shared guides.